
Creating an npm package from my REACT Component
So, you have created a useful, customisable, modular component in REACT. Now, you want to share it with everyone by making a package so that anyone can install it ? That is exactly what I had done and now I also wanted to create a npm package and publish it and this is how I did it.
Prerequisites
Since I was going to create a npm package, I needed to have Node and npm installed on my system.
Also I needed a npm account. I didn’t have one so I had to create one before I got started. You can also create one from here.
Getting Started
First order of business was to select an unique name for my package. I settled on react-rails-pagination as the name for my package.
To confirm that no package with the same name existed I had to use the following command.
npm search react-rails-pagination
You can use
npm search <your-package-name>
And if no existing package is found with the same name, then you are good to go.
After I selected a package name, I had to run the following command in my terminal to initialise the package.
npx create-react-library react-rails-pagination
I was prompted to answer a few questions about my package now

After entering all the information, it will automatically setup the project. This process might take a little time.
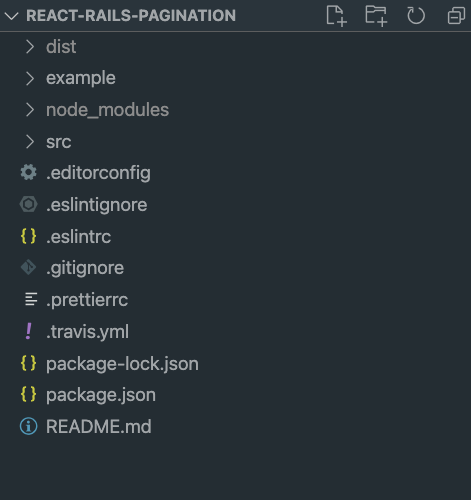
The advantage of using create-react-library is that it will initialise your project to be published along with an example where you can test your package. It will also initialise it as a local git repository which you can simply push to github after adding the URL for your remote repository.
After create-react-library finishes, the folder structure looks like this
I had to run the following commands in two different terminal tabs to start the development environment
cd react-rails-pagination && npm start
cd react-rails-pagination/example && npm start
The first command watches the src/ and recompiles it into the dist/ folder when you make changes.
The second command runs the example app that links to your package.
Adding my REACT Component
Now, I had a look inside the src/ folder in my project. There was an index.js file which held an ExampleComponent that was being used in the example app.
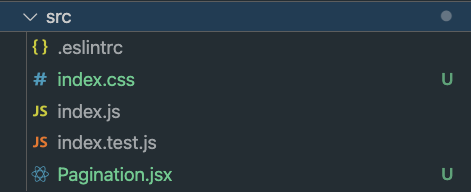
To add my own REACT Component, I placed my Pagination.jsx file that held my Pagination component inside the src/ folder. Since, my component required a css file too, I placed my css file index.css inside the same folder as well. I import this index.css file inside my Pagination component.
I don’t use a separate css module in my component so I deleted the generated styles.modules.css file inside the src directory.
After I had done these changes, my src directory looked something like this
Now, I need to make sure that my component is being exported from this package, so that any project that uses my package, will get to use my component as well.
For this I have to make some changes to the index.js file.
import Pagination from './Pagination';

export default Pagination;
This imports my component into the index.js file and sets it as the default export from the package. I do this because the source file or the entrypoint of my package is the src/index.js file.
If you don’t want to use the index.js file or want to create a new entrypoint then open the package.json file in the root of the project and change the value of the source key in that file.
This completes the process of adding my component to the package.
Checking if my package is working as expected
To check if my package is working or not, I have to go to the example/ folder.
In that folder, I have to edit the App.js file which imports the ExampleComponent that I modified earlier to use my Pagination component.
import React from 'react'

import Pagination from 'react-rails-pagination'
import 'react-rails-pagination/dist/index.css'

const App = () => {
  let page = 1;
  const totalPages = 5;

  const handleChangePage = (currentPage) => {
    page = currentPage;
  }
  return <Pagination page={page} pages={totalPages} handleChangePage={handleChangePage} />
}

export default App;
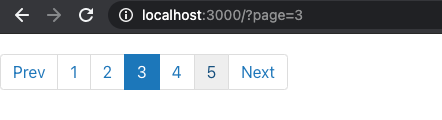
These changes allow me to import my package into this example application and check if it is working or not.
Now if I open the address that the local development server is running on in my browser, I can see that my component is loaded and functioning now.

Publishing my package
I need to add a few things to get this package ready for publishing.
First I add a .npmignore file to stop a few things from being included in my published package to reduce it’s size. It works the same as a .gitignore file but for npm in this case.
The .npmignore looks like this in my project
## the src folder
src
.babelrc
rollup.config.js
## node modules folder
node_modules
## git repository related files
.git
.gitignore
CVS
.svn
.hg
.lock-wscript
.wafpickle-N
.DS_Store
npm-debug.log
.npmrc
#others
config.gypi
package-lock.json
Next I opened the package.json and added a few things in there as well.
{
  "name": "react-rails-pagination",
  "version": "1.0.0",
  "description": "React Pagination Component for Rails and other MVC Frameworks",
  "license": "MIT",
  "repository": "piyushswain/react-rails-pagination",
  "main": "dist/index.js",
  "module": "dist/index.modern.js",
  "source": "src/index.js",
  "engines": {
    "node": ">=10"
  },
  "keywords": [
    "react",
    "rails",
    "mvc",
    "react-component",
    "pagination"
  ],
  "author": {
    "name": "Piyush Swain",
    "email": "piyush.swain3@gmail.com"
  },
  "homepage": "https://github.com/piyushswain/react-rails-pagination",
  .
  .
  .
  .
}
I updated the author field to add my email.
Next, I added the keys homepage and keywords.
homepage can be used to add a website link to your project. I used my github repository link for now but I will change it later when I add a demo to this project. If you have a working demo, you can add that link in it’s place.
The keywords key can be used to give the npm search directory keywords to attach to your project so that people using the npm search engine can find your project more easily. It takes an array of words as an argument.
Finally, I update the README.md file in the root directory to add a description and instructions for anyone using my package. You will have to update your README.md according to your package as well.
I review all the changes and then first push my code to my github repository.
git remote add origin https://github.com/piyushswain/react-rails-pagination.git # Sets the new remote for the local repo
git add .
git commit -m 'Initial Commit'
git push -u origin main  # Pushes the changes to the remote repository
Now, my package is ready to be published. I run the following commands to start the process of publishing my package to npm.
npm login
Login command asks for the username and password of your npm account. Enter those succeessfully and it will log you in to npm. If you have already logged in to npm, then you can skip this step.
npm run build
This optimizes and creates a production build for your package. I recommend running this everytime before you issue a publish command.
npm publish
Finally, running this command will upload your package to npm. You can check it in your npm profile where you can find all your uploaded packages.
If you wish to publish again after making some changes then open your package.json file and update the version key to publish again. Remember to build your package before publishing as it will create an optimized production build for your package.
TIP: If for some reason you cannot get the css to work, then a small hack is to directly update the dist/index.css file as this is the file that is published and used by anyone importing your package